Run GeoXplore Neural Network Module
Much of the documentation found in this section is also available from GeoXplore.pdf, the guide to GeoXplore.exe
Guidance Notes
DataXplore and GeoXplore are very similar in that both provide a Fuzzy Neural Network and the Radial Basis Function Neural Network (RBFLN). GeoXplore was created to fix the known bugs in the DataXplore neural networks. As often happens, the research on these two neural networks has proceeded since DataXplore was written; consequently the results from these two neural networks in GeoXplore are slightly different. So DataXplore and GeoXplore are both provided. DataXplore, however, still has the known bugs discussed in the Guidance Notes for DataXplore.
When Fuzzy Clustering is a Good Method: When the classes form groups that fit inside circles of a fixed radius, then fuzzy clustering is an excellent method that is somewhat robust by being immune to outliers. However, in some cases the classes may be elongated in shape or a shape that curves like a crescent or other irregular object. In this case it is better to cluster the feature vectors into many small circular clusters of which each will be a subclass of a class of feature vectors. In such cases it is often simpler to use the RBFLN or the PNN.
RBFLN and PNN: Both the Radial Basis Function Neural Network (RBFLN) and Probabilistic Neural Network (PNN) have limitations dictated by memory size of the computer. For training, it is best to have smaller training sets. Therefore the maximum training set is limited to 300 evidence layers represented by 1000 training points. For the training, if two training points have the same unique conditions, one point is eliminated. The default is to eliminate the one with the lesser fuzzy membership. If no fuzzy membership of training points is provided then the duplicate "Not Deposits" points are eliminated. For classification, the maximum number of unique conditions is set to 200,000. For very large unique conditions it is often useful to increase the initial number of RBFLN. The maximum number is set to 1000.
In order to use the neural network tools it is necessary to have two training sets, a Deposits and "Not Deposits" training points. Theoretically, we do not need the "Nots" for the PNN. We use only the training vectors with higher fuzzy beliefs (above the threshold of say, 0.5 or 0.55). From these we build a probability density function, which we are using as a fuzzy set membership function (because the value of a probability density function at a single point doesn't tell us much, but a fuzzy set membership function tells us the fuzzy truth that the point, or vector, is in the class of interest). Further testing of this issue is required, but it does appear that when a PNN is to be used, the "Nots" can be a single, exemplar point to allow Set Analysis parameters to complete. Similarly a few "Deposit" points are better than many poor ones. There is much to be learned about how to best define fuzzy memberships for the training sites.
Symbolization: There appears to be some scaling-issues in how the fuzzy-membership output from the RBFLN and PNN are scaled between 0 and 1. It appears that optimal symbolization of the results are obtained using the Quantile method for symbolization. Because there are generally a large number of unique conditions, a larger number of quantiles are useful as a starting point for symbolizatino.
Abbreviations used in the table below are as follows: RBFLN - Radial Basis Function Link Net and PNN - Probabilistic Neural Net
| File naming convention | Definitions |
| sdmuc1_train.dta | Neural network training input file. Used by RBFLN and PNN. Default name generated by Generate Neural Network Inputs. |
| sdmuc1_class.dta | Neural network classification file. Used by PNN, RBFLN and Fuzzy Neural Network Default name generated by Generate Neural Network Inputs. |
| sdmuc1_train.par | Training parameters derived by the RBFLN from training on sdmuc1_train.dta. Suggested name for user to give to the RBFLN training output from the neural network module.. |
| sdmuc1_class.rbn | Classification results derived by the RBFLN classification of sdmuc1_class.dta using the training parameters in sdmuc1_train.par. Suggested name for user to give to the RBFLN classification results output from the neural network module. This file will be the input for the next step in ArcSDM, Read the Results from the Neural Network Module. |
| sdmuc1_train.prb | Training parameters derived by the PNN from training on sdmuc1_train.dta. Suggested name for user to give to the PNN training output from the neural network module.. |
| sdmuc1_class.pnn | Classification results derived by the PNN classification of sdmuc1_class.dta using the training parameters in sdmuc1_train.prb. Suggested name for user to give to the PNN classification results output from the neural network module. This file will be the input for the next step in ArcSDM, Read the Results from the Neural Network Module. |
| sdmuc1_class.cen | Centers of the clusters found by the Fuzzy Neural network in the so called "Training" set using sdmuc1_class.dta as the input. Suggested name for user to give to the RBFLN training output from the neural network module. |
| sdmuc1_class.fuz | Classification results derived by the Fuzzy Neural Network classification of sdmuc1_class.dta using the clusters centers stored in sdmuc1_class.cen. Suggested name for user to give to the RBFLN training output from the neural network module. This file will be the input for the next step in ArcSDM, Read the Results from the Neural Network Module. |
![]()
To run GeoXplore
Select 'Run Neural Network Module: GeoXplore.' from the ArcSDM3 menu.
This will launch GeoXplore, which is a separate standalone Microsoft Windows program.
While GeoXplore is running, ArcMap is fully accessible.
The remainder of this section describes how to use GeoXplore with reference to ArcSDM3 and the input files generated in the previous step. The three neural networks, RBFLN, PNN, and Fuzzy neural network can be used individually or together as the user desires.
![]()
To perform Radial Basis Functional Link Network analysis (RBFLN)
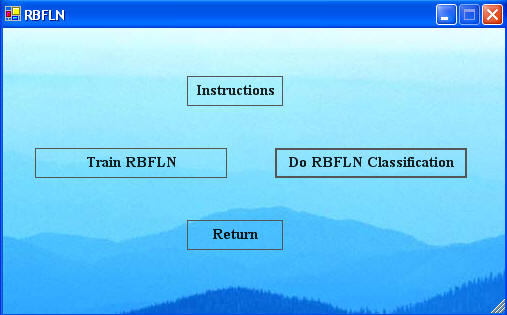
First click the RBFLN button to bring up the following menu.
Then there are two steps:
![]()
Training
Click the 'Train RBFLN ' button in the main RBFLN window to display the following RBFLN Training window:
Select the file that contains your training data by clicking "Load File" and click OK. The default name for neural network training data files generated from ArcSDM3 is sdmuc#_train.dta. When the Load File button is clicked, a menu to navigate to the working folder with the files to classify is provided.
Select the file that will contain the training results by clicking "Save As". A navigation window will come up in which you type the name of the file. Note the full path is provided by this process as in the example above. If the input file for training is sdmuc18_train.dta, then the training results file can be named sdmuc18_train.par, where the par is automatically added.
The RBFLN parameter dialog is then displayed:
The parameters in the box 'RBFLN Parameters From data File' are read from the training data file specified in the previous step. These parameters are discussed in GeoXplore.pdf and require no user input.
Click 'OK' in the RBFLN Parameters window. A report is displayed in the window of the RBFLN Training window as shown below:
Window will report measures of the fit of classification of the training set. This Fit to Class measure is a fuzzy belief (truth) measure of the classification. It should have a value between zero and 1 with zero indicating no belief and 1 indicating complete belief.
Save the results of the training session
This PAR file must be created for input into the classifying steps that follow. The file name will end with the extension par. It is suggested to name this file sdmuc#_train.par to indicate that this PAR file is from training on the sdmuc#_train.dta file.
![]()
Classify
Click "Do RBFLN Classification" in the RBFLN window, shown below, to get to the RBFLN Classification window, shown next.
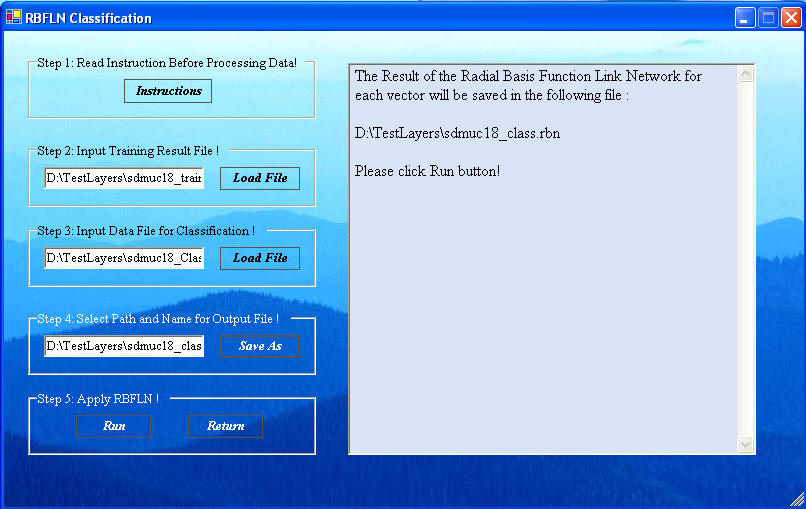
Click "Load File" in Step 2 to open a navigation window to select the Training results data. Select the PAR file created in the Training that contains the training results.
Click the "Load File" in Step 3 to load the data for classification. The default name for this file created by ArcSDM3 is sdmuc#_class.dta. As shown above all of these files will have their full path indicated in the window.
Click the "Save As" in Step 4 to name the file to how the results. A typical name might be sdmuc#_class.rbn, where the rbn suffix is automatically added.
When all the files are added, click "Run" in Step 5 to get the results, shown next. The window provides information on the goodness of fit. The fix of the classification is a fuzzy belief in the truth of the classification.
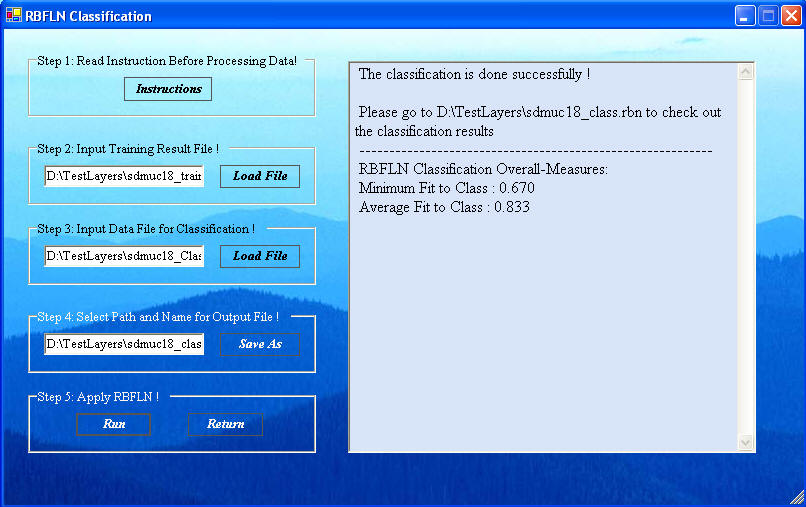
Clicking "Return" will return you to the RBFLN main window where clicking "Return" will get you back to the GeoXplore window. The RBFLN training and classification is now complete.
| Next | Section Contents | Home |
![]()
Fuzzy Clustering: Fuzzy (Unsupervised)
There are two steps in doing a classification by fuzzy clustering:
Although the Fuzzy neural network does not use training points, the process is done in two steps, clustering or training to define the cluster centers and then classification of all the data based on these clusters. The clustering to define the centers is done by the processes labeled Training. Then the classification based on these centers is applied by the process labeled Classification. This partition of the processes allows the user to apply the centers from one data set to different dataset with the same evidence layers, if desired.
When Fuzzy Clustering is a Good Method. When the classes form groups that fit inside circles of a fixed radius, then fuzzy clustering is an excellent method that is somewhat robust by being immune to outliers. However, in some cases the classes may be elongated in shape or a shape that curves like a crescent or other irregular object. In this case it is better to cluster the feature vectors into many small circular clusters of which each will be a subclass of a class of feature vectors. In such cases it is often simpler to use the RBFLN or the PNN.
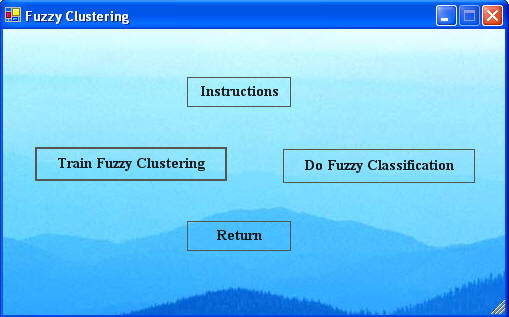
To start the Fuzzy Neural Network, click "Fuzzy Clustering" from the GeoXplore window, which will open the Fuzzy Clustering window.
![]()
Training
First the fuzzy centers must be defined by clicking the "Train Fuzzy Clustering" in the Fuzzy Clustering window.
In the Fuzzy Clustering Training window, Step 2 is to click "Load File" to input the training data. This will open a dialog prompting you to select a 'Fuzzy Train Data File'. The fuzzy clustering algorithm trains using the complete data set that is to be classified. If your input files were generated by ArcSDM3, this file is the one that contains the entire unique conditions table information. The default name is sdmuc#_train.dta. If the number of unique conditions is less than 300, it is possible to use the sdmuc#_class.dta file for training. The maximum number of records considered for training is 300; so sometimes interesting results can be obtained by training on the class file.
Step 3 is to click "Save As" to select the path and name of the training results, a file with the extension CEN. A typical name provided by the user for this file might be sdmuc#_class.cen, where the cen suffix is automatically added.

Step 4 is to click "Run", which opens the Fuzzy Train Functions window, below.
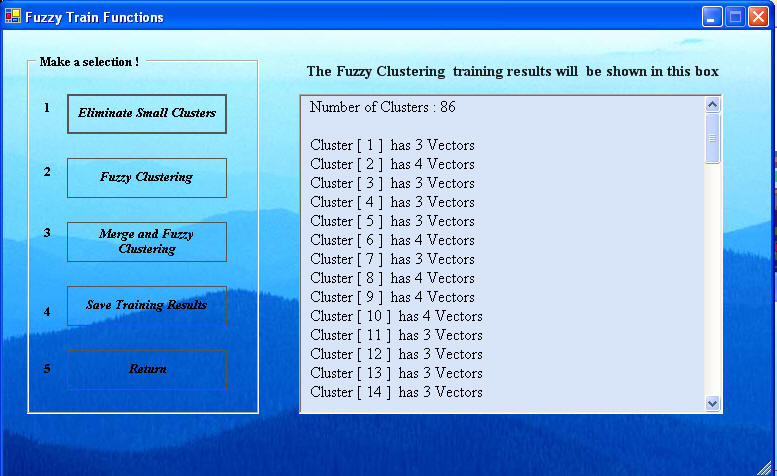
Click the Eliminate Small Clusters button next and then click it again. Repeat until the number of clusters does not change on a click. We may not know how many clusters K there should be, but we will use the Xie-Bene clustering validity to tell us what value of K gives the best clustering.
Now click the Fuzzy Clustering button first to get the results below. Notice the clustering validity number. The greater this number, the greater the clustering goodness. While it is usually a good way of determining the best number K of classes, it does not always provide the best classification number, so if the we know how many clusters there should be, then we should use that number for K. For example, if a test is either benign or malignant, then the correct number of clusters should be K = 2. However, if some data does not fall into either, then there may be K = 3 classes: benign, malignant and indeterminate. Classification is an intuitive art as well as a science.
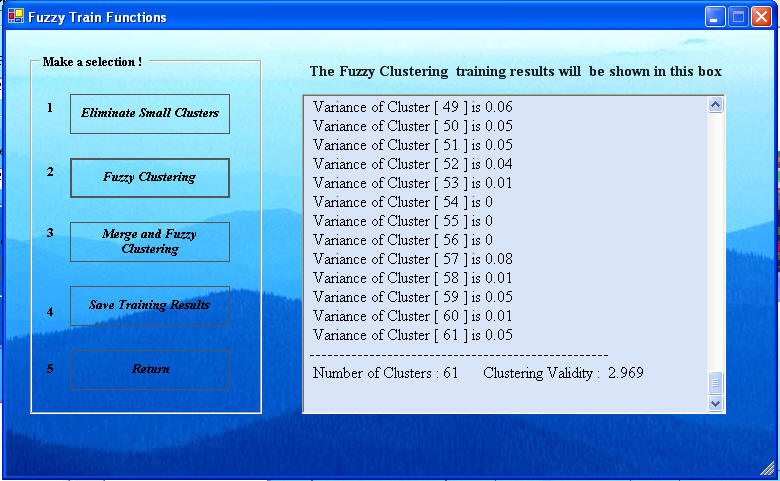
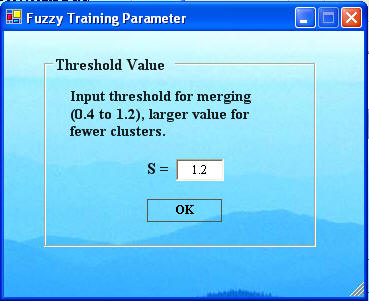
Next click the Merge and Fuzzy Clustering button the Fuzzy Train Function window to get the Fuzzy Training Parameter window shown below. Here the default parameter is 0.4, but a S value of 1.2 has been selected. This is the proportion of the average distance between cluster centers to use as a threshold for merging two clusters. If the average distance between pairs of cluster centers is a, then if any distance between a pair of cluster centers is less than 0.4a, the clusters will be merged into one cluster and fuzzy clustering is done again with one less cluster center. First use the default 0.4. If the number of clusters reduces, then repeat with the same parameter. Otherwise, increase the parameter from 0.4 (0.4, 0.5, 0.6,... is usually good). Note the clustering validity value for each value of the number of clusters K. The K value with the highest clustering validity is usually the best unless there is other information to override it. Stop at K = 2 clusters and examine the clustering validity values, or possibly stop when K is the known value. For our data, when we stop at K = 2, the result is that in The Fuzzy Train Functions window below..
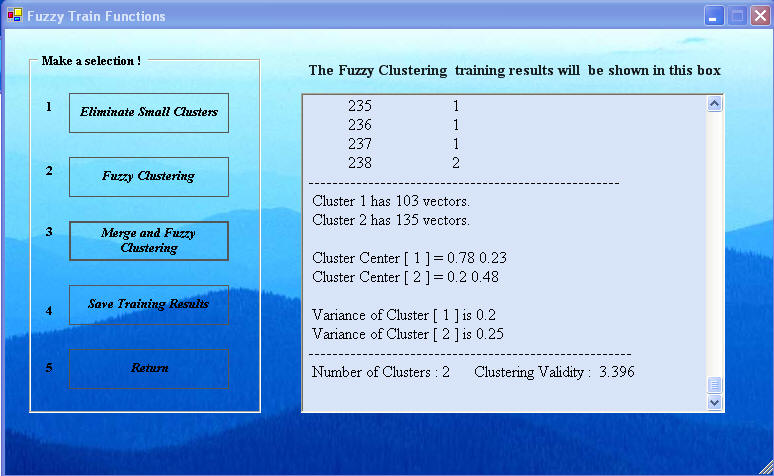
For this example, we anticipate the number of clusters is 2, deposits and not deposits. Selecting a larger Threshold value in the Fuzzy Training Parameter can help reduce the number of clusters. If the number of clusters cannot be reduced further and the clustering validity is as large as it will go, then the best result obtainable with the Fuzzy Neural Network has been attained. Click "Save Training Results" and "Return". Training to define the cluster centers is now complete. The next step is to do the classification.
![]()
Classify
Click "Return" to get back to the Fuzzy Clustering window and click 'Do Fuzzy Classification' to start the classification process. This will open the window below.
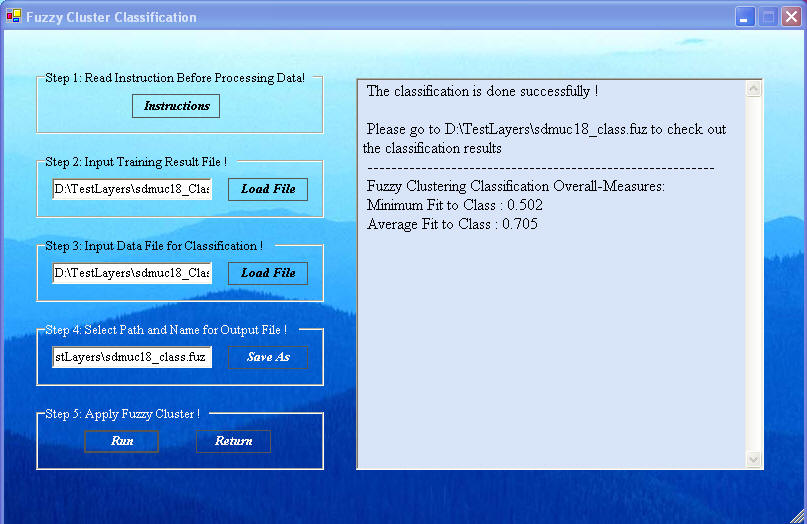
As before, in Step 2 click "Load File" to get the input Fuzzy Centers file, a file with the name sdmuc#_class.cen.
Then is Step 3 click "Load File" to load the data to be classified, a file with the name sdmuc#_class.dta..
For Step 4, click "Save As" to define the path and name of the output fuz file, the user supplied name might be sdumuc#_class.fuz, where the suffix fuz is automatically added.
Having loaded and defined all of the necessary files, click "Run" to get the results shown above. The Fit to Class measures will give a measure of the quality of the classification. This measure is a fuzzy belief measure between 0 an 1, with zero for no belief in the truth of the classification and with one for total belief in the truth of the classification.
Click "Return" to get back to the GeoXplore window.
| Next | Section Contents | Home |
![]()
To perform Probabilistic Neural Network analysis (PNN)
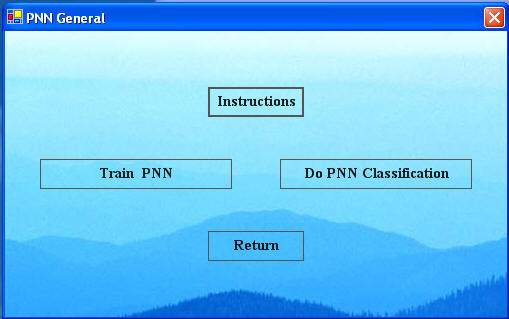
First click "Probabilistic NN" in the GeoXplore window to bring up the PNN General window, below.
Similar to the other neural network methods, there are two steps:
![]()
Training
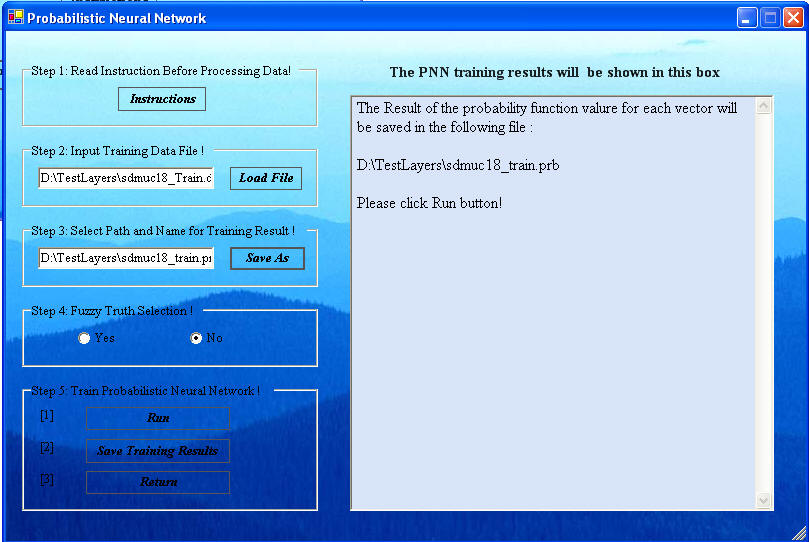
Click the 'Train PNN' button in the PNN General window to display the following dialog:
There are five steps to the training. Step 1 is to read the instructions, if needed.
Step 2 is select the file that contains your training data by clicking "Load File" of Step 2 in the window. The default name for neural network training data files generated from ArcSDM3 is sdmuc#_train.dta. When the Load File button is clicked, a menu to navigate to the working folder with the files to classify is provided.
Step 3 is name the path and the file that will contain the training results by clicking "Save As" in Step in the windos. A navigation window will come up in which you type the name of the file. Note the full path is provided by this process as in the example above. If the input file for training is sdmuc18_train.dta, then the training results file can be named sdmuc18_train.par, where the par is automatically added.
Step 4 is to click the Yes/No radio buttons to indicate if fuzzy membership values are available. Fuzzy membership values will always be available in the ArcSDM3 files. The fuzzy memberships will be 1 for Deposits and 0 for Not Deposits, if the user did not provide fuzzy membership values. So it is probably best to always click the Yes radio button.
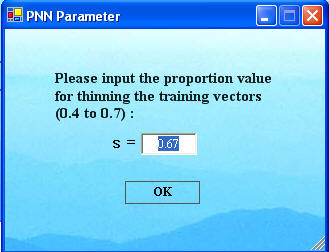
Step 5 is to click "Run", which brings up the parameter window below. The window below will then come up with a proportion parameter as shown. This parameter is the proportion of the average distance between training feature vectors to use as a threshold. If any vector is closer to another than this proportion of the average distance, it is eliminated as a center of Gaussians to be summed to construct a probability density function (pdf) for a class. A larger threshold eliminates more vectors and increases computational speed, but it is a trade-off between speed and accuracy up to a point. A small proportion for a large number of training vectors uses too many Gaussians and causes extraneous error to build up during computation of the pdfs. The user should experiment with this.
Click 'OK' on the PNN Parameters window after making your selection.
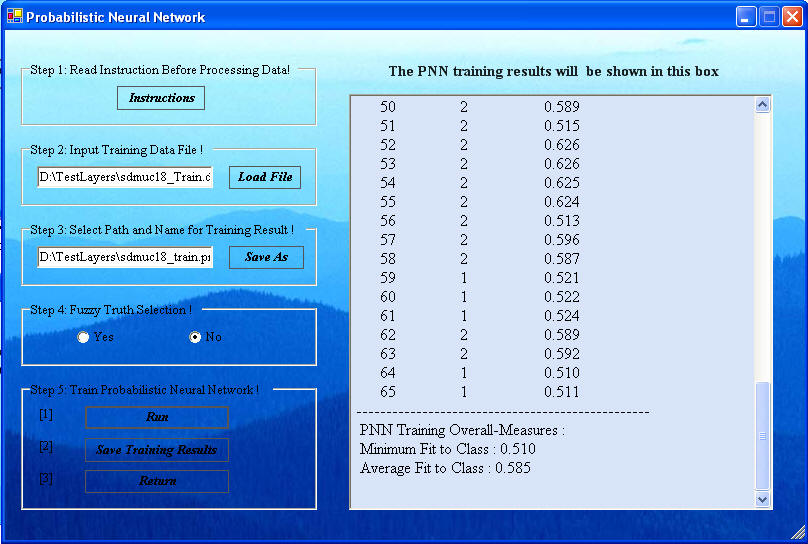
. A report is displayed in the window of the Probabilistic Neural Network window as shown below will appear with the Fit to Class measure. This Fit to Class measure is a fuzzy belief (truth) measure of the classification. It should have a value between zero and 1 with zero indicating no belief and 1 indicating complete belief.
Save the results of the training session
This PAR file must be created for input into the lassifying steps that follow. The file name will end with the extension par. It is suggested to name this file sdmuc#_train.par to indicate that this PAR file is from training on the sdmuc#_train.dta file.
![]()
Classify
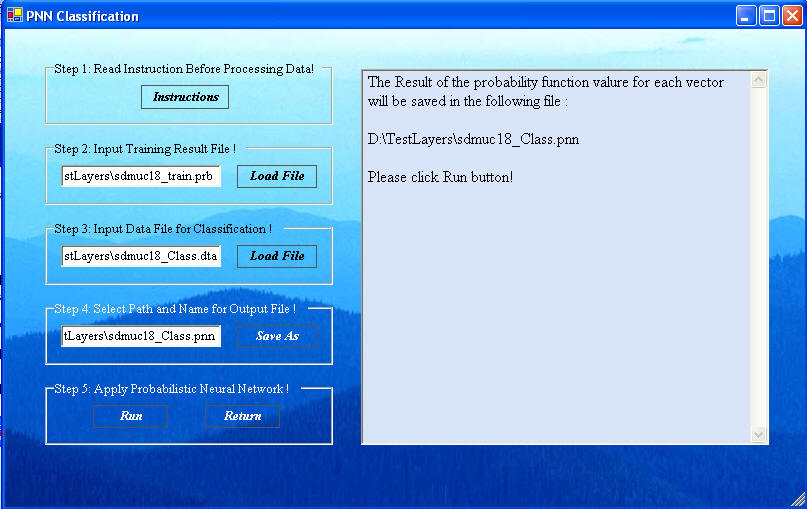
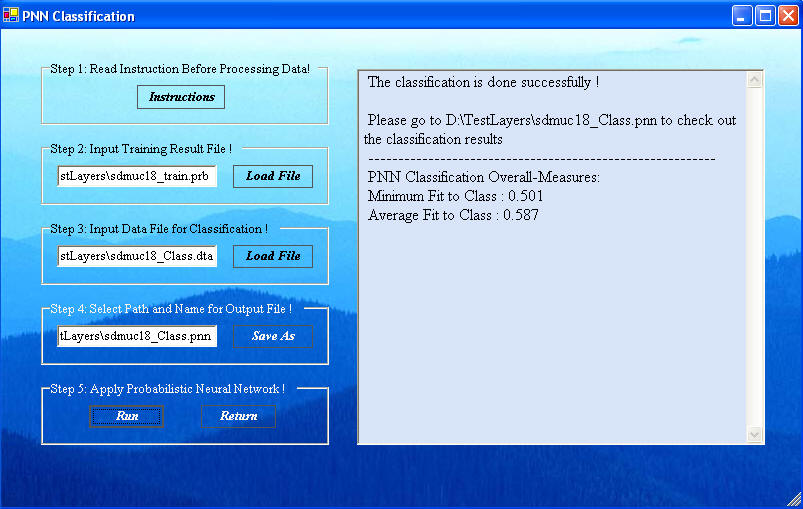
Click "Do PNN Classification" in the PNN General window, shown below, to get to the PNN Classification window, shown next.
Click "Load File" in Step2 to open a navigation window to select the Training results data. Select the PRB file created in the Training that contains the training results.
Click the "Load File" in Step 3 to load the data for classification. The default name for this file created by ArcSDM3 is sdmuc#_class.dta. As shown above all of these files will have their full path indicated in the window.
Click the "Save As" in Step 4 to name the file to how the results. A typical name might be sdmuc#_class.pnn, where the pnn suffix is automatically added.
When all the files are added, click "Run" in Step 5 to get the results, shown next. The window provides information on the goodness of fit. The fix of the classification is a fuzzy belief in the truth of the classification. The "Run" button will automatically save the results in the selected PNN file.
Clicking "Return" will return you to the PNN General window where clicking "Return" will get you back to the GeoXplore window. The PNN training and classification is now complete.
| Section Contents | Home |
![]()