Reclassify Tool
This tool was developed for those who would like to reclassify a grid theme and keep a record of the input classifications (minimum and maximum of the range of values for each output class). NOTE: The resolution of the output grid cannot be coarser than that of the input because the tool cannot record how Spatial Analyst handles a reduction in classes.
This function is based on the Reclassify function found in the Spatial Analyst's Analysis menu, but differs in three ways:
To Reclassify the values in a grid theme:
Make the grid theme you want to reclassify active.
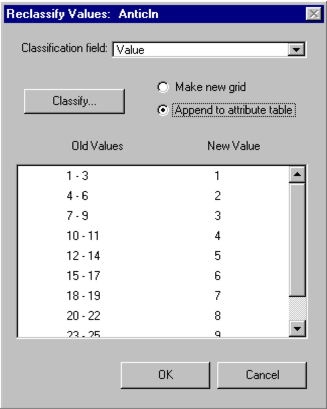
Select 'Reclassify Tool...' from the SDM menu.
If the theme is an integer grid theme, there will be a pair of radio buttons on the dialog labelled 'Make new grid' and 'Append to attribute table'. Select one of these options. If neither is selected, the reclassification defaults to appending the reclassification information to the input grid theme attribute table.
| Option | Description |
| Make new grid |
|
| Append to attribute table | Both
are appended to the input grid theme attribute table. |
To define a classification:
Click the 'Classify' button.
The dialog that is displayed works the same way as the classification dialog used with the ArcView legend editor and the Spatial Analyst reclassify tool.

The following steps are copied from ArcView On-Line Help.
For more information about defining a classification, refer to the ArcView On-line Help Topics:
legends,
classification -> Set a classification
legends, classification, Classifying
To edit any of the 'Old Values' or the 'New Value' for an individual classification:
To apply the classification:
| Next | Section Contents | Home |
![]()