![]()
Guidance Note: The Spatial Analyst/Options are not affected by any of the Set Analysis Parameters settings of ArcSDM3. If the user desires to process a raster using the Spatial Analyst functions, the Options must be set independent of mask, extent, or cell size set by ArcSDM3.
The table below indicates by a check where each of the parameters is utilized.
|
Weights of Evidence | Logistic Regression | Neural Network | Fuzzy Logic | ||
|---|---|---|---|---|---|---|
| Parameter | Normal | Expert | RBFLN (Supervised) |
Fuzzy Clustering (Unsupervised) |
||
| Study Area Raster Theme | ||||||
| Unit Area | ||||||
| Deposit Training Point Theme | ||||||
| Non-deposit Training Point Theme | ||||||
| Default Missing Data Integer | ||||||
| Missing Data | Defined individually for each input theme. | |||||
| Raster Cell Size | Set to the minimum cell size of inputs. Not affected by user inputs to Spatial Analyst/Options settings. | |||||
| Method uses Unique Conditions Raster/Table | ||||||
![]()
This menu item opens the Analysis Parameters dialog box. Select this option to set and edit parameters. Each parameter is described below. Once the parameters are set they remain in effect until changed for any analysis done in the active data frame with the following exception:
The extension sets the theme you select for the Study Area Theme as the Mask for the ArcSDM3 analysis. This is independent of the analysis parameters that the user map set in the Spatial Analysis Options menu.
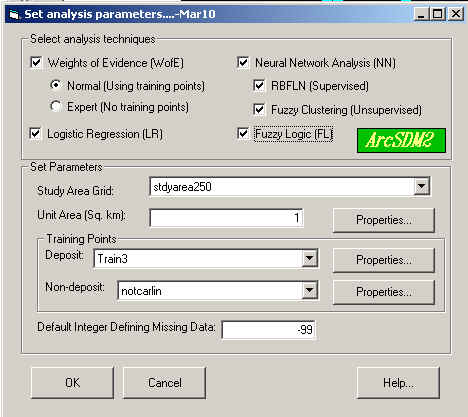
What happens to the parameters you have set when you change Data Frames or reopen a project file
The Data Frame above is for the Data Frame Mar10, as indicated in the text in the blue bar. Each Data Frame has its own parameters file. These parameters are saved in a text file in the working area for the project. The name of this text file for the Mar10 Data Frame is Mar10_AnalysisParameters.txt. The next time the project of MXD file is opened, these parameters will be remembered and do not need to be reset. Thus it is important that the user rename each Data Frame.
| Next | Section Contents | Home |
![]()
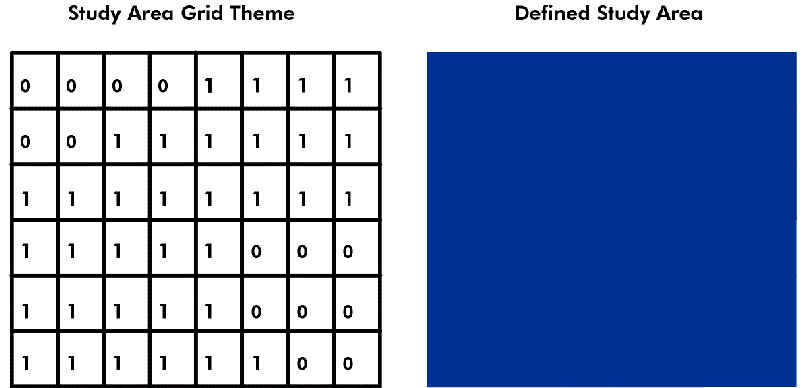
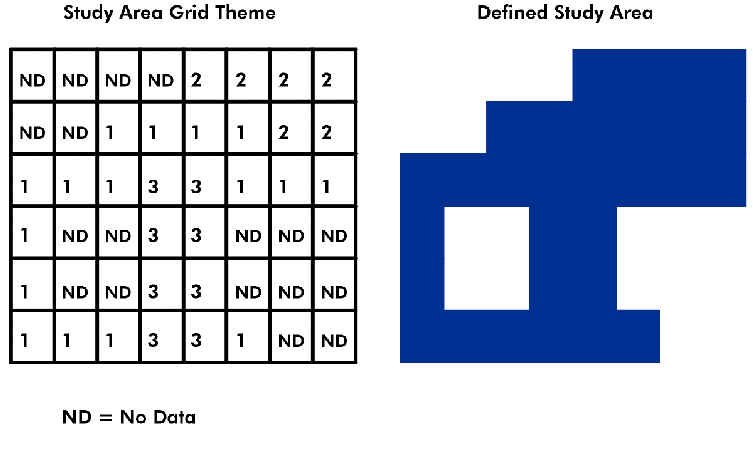
ArcSDM3 requires that an integer raster theme be specified as a Study Area Theme for all methods. The Study Area Theme is a theme based on a raster data set that defines the geographic extent of the analysis study area. It controls the Analysis Extents and Mask but is independent of the the current Spatial Analysis Options. The Study Area layer should have a cell size no larger than the smallest cell size of any evidence layer to be used in the analysis. This cell size is used to calculate the area of 'Missing Data' in the study area. The Study Area raster must have a attribute table. For ArcMap 8.3, a single valued raster made from a 16-byte raster does not have an accessible attribute table; a multi-valued raster will have an attribute table. So the Study Area raster can be multi-valued.
Select Study Area Theme from Combo Box
The combo-box labeled 'Study Area Grid' contains a list of all integer raster themes in the current data frame. Select the theme you want to use as the study area theme. The current Analysis Mask, if any, is displayed by default. By default, the 'Study Area Grid' is assumed to be the last one in the table of contents.
Selecting a new study area theme will cause the controls in the Unit Area Properties dialog to be recalculated.
How the Study Area Raster Theme defines your study area
'No Data' represents a Null cell value. (It corresponds to -9999 in ARC/INFO.)
| Next | Section Contents | Home |
What you can use as a Study Area Raster Theme
If you want to use a data set as both your Study Area Theme and as an Evidential Theme:
ArcMap on-line Help Topic: Cutting, copying and pasting themes
Make a copy of the Raster Theme:
Right click on the desired raster in the data frame's Table of Contents.
Select 'Copy' in the drop-down menu.
Right click on the Data Frame name and select 'Paste Layer'.
Ensure that the copy has a different name from the 'original' theme by renaming one or both themes:
To rename a theme:
Right click on the desired in the data frame's Table of Contents
Select 'Properties' from the drop-down menu
Select the General tab and edit the name in the Properties window.
You can also copy themes to other Data Frames.
| Next | Section Contents | Home |
How you can create or prepare a Study Area Raster Theme:
ArcMap on-line Help Topic: Reclassifying the cell values of a raster theme
Spatial Analyst Analysis-->Reclassify...
Reclassify one or more classes that define areas outside the study area to ‘No Data’
Set the Analysis Extent, Cell Size and Mask under the 'Options' item in the Spatial Analysis menu.
Make the Raster Theme you want to reclassify active by clicking on its legend in the data frame's Table of Contents.
Select 'Reclassify...' from the 'Spatial Analysis' Menu and fill out the menu to reclassify the raster as desired.
This will create a temporary raster. It is necessary to make this raster permanent before ArcSDM3 can use it. Right click on the reclassified raster and select 'Make Permanent'. This will allow you to move this raster to your working area and give it an appropriate name. The name should not be longer than 9 characters because evidence layer names are used at attribute names by ArcSDM3 in DBF files.
The raster in the Table of Contents needs to be renamed by right clicking on the layer and selecting 'Properties'. Then under the General tab, change the name to match the name give.
This will calculate the reclassified raster and add it to the top of the Table of Contents of the current data frame, with the name 'Reclass of' <Input Theme Name>.
Creating a Study Area Raster Theme
You can create a raster with cells containing a single value from scratch.
Click one or more digits in the number keypad to define the value you want to fill the grid's cells.
Click 'Evaluate'.
You can also type the expression in the display window, although ArcMap is finicky about format including spaces.
Convert a set of polygons whose extent defines the study area to a Raster
| Next | Section Contents | Home |
![]()
Defining Area Units
You need to define a unit area that ArcSDM3 will use as the area unit of measurement during calculations for weights of evidence, logistic regression and neural network analysis. Input a unit area in square kilometers, km2 , in the text input line labeled 'Unit Area (Sq. km):' When you change the unit area, the total study area measured in units area will be updated.
Click the 'Properties' button to display a dialog with more information to assist in the selection of the unit area.
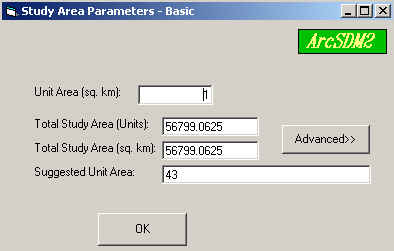
The unit area Properties dialog reports the following information:
The total study area reported in km2 and in unit cell area in the Study Area/Unit Area of the Analysis Parameters dialog box are based on the area of Study Area Theme pixels containing values. The area reported in the weights area, for example the cumulative area of all classes in an evidential theme, may vary from this area because the output cell size differs from the cell or pixel size of the study area theme, or because the area of all classes in the evidential theme is less than the study area defined by the study area theme. The study area theme area is used as the total area in the weights formulas in these cases.
The Suggested Unit Area is calculated using the following equation:
suggestedValue = (totalStudyArea / total TrainingPoints) / 40
This suggested value is a guideline that is normally acceptablely large. Typically your unit area should be about the same or smaller than the suggested unit area. This suggested unit area does not typically seem appropriate probably because the number of training sites is typically quite small.
The Expert Weights of Evidence option
This option does not rely on a user specified unit area. Instead, a limiting value of unit area is assumed.
| Next | Section Contents | Home |
![]()
The Training Point Theme(s) are point data sets. ArcSDM3 deals with two types of training points, one that defines the occurrence of a point object, and the other defining the absence of a point object. For mineral exploration, each "deposit" training point is a known mineral occurrence or deposit. Each "non-deposit" training point is the location where there is known to be no mineral occurrence.
Weights of evidence normal option, logistic regression and the neural network RBFLN option require a deposit training point theme. Only the neural network RBFLN option requires a 'non-deposit' training point theme.
Usable file formats
ArcMap on-line Help Topic: Add Event Theme (Dialog box)
NOTE: ArcSDM3 will not work with a multi-point feature type, one of the feature types available in ArcMap, nor will it work with the label points from a coverage..
A subset of this point data set can also be used for analysis without creating a new data set.
To use a subset of your theme:
Select a training point theme from the drop-down list.
Click the 'Properties' button beside the drop-down list. The training points properties dialog:
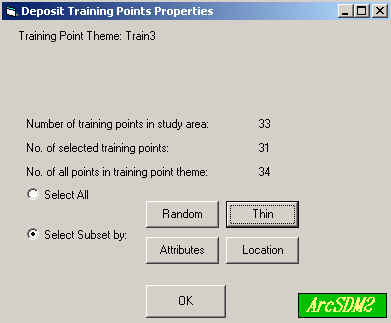
Number of all Points in Training Point Theme
The total number of points in the specified training point theme is displayed. If you have selected a subset of your training points, the total number of points in the subset is displayed. This number may be more than the total number of deposits used in weights calculations if one or more of the points fall outside the study area as defined by the study area theme.
Use all of your training points or a subset
You can toggle between 'All' of the points in your training point theme, or a 'Subset' of them by clicking the radio buttons labeled 'Select All' and 'Select Subset by:'. Clicking the 'Select Subset by:' applies the last defined subset if it is applicable to the currently selected training point theme. The buttons labeled 'Attributes', 'Random', 'Location' and 'Then' are also enabled with the 'Select Subset by:' button is selected.
Clearing a subset
To clear a subset, click the 'Select All' button. You can use any of these options to reduce or select a subset of your training point set.
| Next | Section Contents | Home |
![]()
Select a Subset by:
![]()
You can define or change a subset of the training points based on its attributes by clicking the button labeled 'Attributes'. This displays ArcMap’s Query Builder dialog.
Build your query and click 'OK'.
ArcMap on-line Help Topic: Selecting Records in a Table
The total number of training points will now display the number of points identified by your query and the suggested unit area will also be updated below.
How ArcSDM3 subsets the training point data set
The query will be applied to the training point theme as a 'definition'. All of the features, and their attribute records, not included in the definition will be high lighted in your data frame. The definition query string is also set as an attribute of the theme's attribute table.
![]()
To make a random subset of training points, click the button labeled 'Random'. A dialog box is displayed which allows you specify either the number of records or the percentage of records you would like to include in the subset. If the you specify a percentage, you can see how many records this will include. Click 'OK' to make the random selection. The random selection of a subset of training points is done in two steps:
Generating Random Numbers
ArcSDM3 will first look for a field called 'Random' in the attribute table of the specified training point theme. If not found, an integer field with this name will be appended to the data set. A random number between 1 and 1000 (ArcMap's random number generator returns integers) will be generated for each record in the attribute table and then written to the new field.
If a field called 'Random' already exists in the attribute table, you will be asked if you want to overwrite the files contained in that field. Two things to consider when deciding to overwrite previously generated numbers are:
If you choose 'Yes', a new set of random numbers will be generated and written to the 'Random' field. If 'No', the selection will be made on existing values.
![]()
ArcSDM3 will automatically remove some points from the training point theme (not permanently!) so that there is no more than one training point per unit area. The algorithm starts with the point defined in the first record of the point theme attribute table, calculates the distance to the other points "below" it in the attribute table and removes any that are less than the distance defined by:
(Unit Area * 1000000 / 3.14) 0.5
Selecting the Records
Starting at the lowest random number, the next highest random number is added to the subset until the number of records in the subset is what you specified. The subset is applied to the training point theme as a theme definition. Only the randomly selected features and their attribute records can be seen in the data frame and Table documents.
Actually selecting the subset is like selecting a subset based on attributes. In fact, once the random numbers have been written to the theme's attribute table, you can re-establish the selection at a later time by clicking the Subset by: 'Attribute' button and querying the 'Random' field using the Selection by attributes (see above).
![]()
You can also interactively select a subset of your training point theme using the 'Select Points By Location...' item. A subset definition made this way will persist only for your current ArcMap session.
To subset a point theme by location:
To remove a selection set (select all the points in the theme):
Click 'Clear Selection'
| Next | Section Contents | Home |
![]()
Maintaining a complete training point theme, as well as one or more subsets
You may want to have your complete training point theme available, as well as one or more subsets in your data frames at the same time. For example, say you would like to maintain the complete set of training points, a randomly generated subset of the training points, and a second set of the points not included in the random subset. You could make these three themes as follows:
Make two copies of your training point theme by making the training point theme active and selecting 'Copy' and then select 'Paste' from the data frame drop down menu to paste a copy of the layer. Rename the copies of the training point theme.
Open the ArcSDM3 parameters dialog box by selecting 'Analysis Parameters...' from the ArcSDM3 menu. Make your randomly selected subset using the steps described above and click 'OK'.
You can make an attribute query on the Random field to subset the remaining points. For example, if the query defining your random subset is ([Random] < 498) then to select the points excluded from this subset you could apply the query ([Random] >= 498).
| Next | Section Contents | Home |
![]()
Default Missing Data Value
ArcSDM3 handles areas of missing data in your evidential themes in different ways, depending on the method being used. How missing data is handled is discussed in the sections explaining each method. Missing Data is an area of No Data in an evidential theme within the study area or 'Missing Data' could be a class of an evidential theme that has been generalized to have the 'Missing Data' value.
Generally:
| Method | Handling of Missing Data |
|---|---|
| Weights of Evidence |
|
| Logistic Regression | areas with missing data are assigned a value that is the area-weighted mean of the known values in the study area for each evidential theme |
| Neural Network |
|
| Fuzzy Logic | areas of missing data are assigned a fuzzy membership value that is an area-weighted mean of the fuzzy membership values defined for the areas of known data |
ArcSDM3 requires that an integer value defining areas of missing data be specified for every evidential theme, whether or not there is any missing data in the study area. If areas with missing data are defined in the evidential theme by 'No Data' or the absence of a data within the study area, ArcSDM3 will fill them in 'on-the-fly' with the missing data integer. In most cases, this allows the areas to be captured in the unique conditions raster and attribute table.
You can specify any integer to define areas of missing data and this can be done at two levels: a default value is specified in the Analysis Parameters dialog by entering it in the text input line labeled 'Default Integer Defining Missing Data:' In the processing for each method, the user is prompted to specify or confirm the missing data integer for each evidential theme. Once specified for an evidential theme, the value is recorded in an ArcMap table, 'SDM Theme Properties' (DataFrame Name_AnalysisParameters.dbf). Users can change this value at any time.
TIP: While you are able to specify a different missing data value for each evidential theme, it is recommended that the same value be used for all evidential themes for the sake of consistency and data organization. Be careful, however, that the missing data value does not coincide with an actual value in one of your evidential rasters.
What is the difference between 'Missing Data' and 'No Data'
In an ArcSDM3 FAQ, this question would be at the top of the list!
'Missing Data' is an ArcSDM concept used to identify data within the study area that is to be treated as a 'No Data' areas or to identify areas of actual 'No Data' that are within the study area. This is a useful concept when some classes of a raster are to be ignored, for example geologic map units that are younger than the deposit type being modeled and thus could be covering a deposit. By treating these geologic map classes as 'Missing Data', these areas are weighted either as a weight of zero in weights of evidence or a area-weighted mean in the other methods.
'No Data' is a concept used by Spatial Analyst to specify that there is no data value associated with one or more cells in a raster. (It corresponds to -9999 in Arc/INFO.) Cells with No Data can be symbolized, reclassified, displayed in a legend and handled in different ways, However, they are not included in the attribute table of an integer raster theme. In the context of ArcSDM3, cells with 'No Data' perform different functions and are handled in different ways:
For the study area raster theme, cells containing 'No Data' define areas that lie within the extent of the study area raster theme but which lie outside the study area. This provides a mechanism to create a non-rectangular study area and to exclude islands within the study area.
Default symbolizations of new themes generated by ArcSDM3, the 'No Data' class is set to a transparent fill.
Cells with 'No Data' in a raster evidential theme (or areas with no cell values, for a feature evidential theme) fall within the study area are assumed to define areas where data is missing. In this case the concepts of 'No Data' and 'Missing Data' refer to the same areas of an evidential theme. The term 'Missing Data' is specific to ArcSDM3. Each method in ArcSDM3 handles missing data in an explicit way but cannot apply their techniques to 'No Data' cells. In order that 'No Data' areas be handled as missing data, they are replaced on-the-fly with a user specified integer value.
TIP: On the basis of the above definition of Missing Data, do not reclassify any classes of an evidence raster that will be used with a cumulative weighting in weights of evidence as Missing Data. This will cause the Missing Data class to be generalized to class 0 in the Gen table based on the cumulative weight; consequently this class 0 will be treated as a valid class and given a weight other than zero. Zero is the weight given an area of Missing Data. Thus the Missing Data value should only appear in a Gen table, never as a value in the evidence raster. Areas of No Data in an evidential raster should remain as No Data. Then such areas will be properly treated as Missing Data in the weights calculations.
![]()
Analysis Cell Size
The analysis, or output, cell size is set by default to the minimum cell size of the evidence layers or that of the Study Area raster, which ever is smaller. The user cannot control this except by the cell size of the Study Area raster. The cell size of the Study Area raster should be at least as small as smallest cell size of any evidence layer used. This cell size is used to compute the area of 'Missing Data'.
Note that the analysis cell size and the unit area are unrelated.
| Next | Section Contents | Home |
![]()