Buffer Features...
This function allows you to create a set of one or more buffers around point, line or polygon features. The input may be a Feature Theme or a Grid Theme. The output is always a Grid Theme.
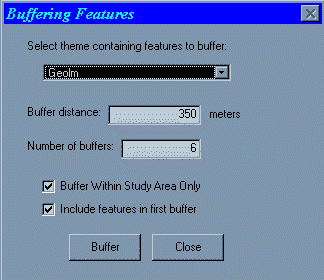
Buffer Features Dialog

Input Theme – If your input theme is a Grid Theme, you may need to select your features before buffering.
Buffer distance – Type in the size of the buffer interval. You may get unexpected results if your buffer interval is smaller than your Analysis Cell Size. To check or edit the Analysis Cell Size, select Properties from the Analysis menu.
Number of Buffers – Type in the number of buffers you would like to create. All cells outside the distance equal to the interval size times the number of intervals will be grouped in a single class.
Confine buffering to study area – If this box is checked, the output grid will only contain buffer values within the study area. All cells outside of the study area will contain ‘No Data’.
Include features in first buffer – Check this box if you want to include your features in the first buffer interval. By default the box is checked. If checked, the cells that define the feature will be assigned the value of the first buffer interval. This is the preferred option in most cases, usually for buffering point and line features. Sometimes you may want to retain the buffered features separately in the output grid. If unchecked, the cells that define the buffered features will be assigned a value of 1. This is usually done for polygon features.
How to buffer a set of features
1. Set the analysis cell size by selecting Properties from the Analysis menu. If you select a cell size larger than your desired buffer interval, you may get unexpected results. If you do not select a cell size prior to buffering, and your input theme is a Feature (vector) theme, you will be prompted during buffering to specify a cell size.
2. If you want to confine buffering to your study area, ensure that the Study Area Grid Theme is selected by choosing Set Parameters from the Weights of Evidence menu.
3. The buffering function buffers all selected features (Feature Theme) or cells (Grid Theme), or, if none are selected, all features or cells. If you want to buffer a subset, select it before running the buffering function.
4. Select Buffer Features... from the Weights of Evidence menu to display the Buffer Features dialog.
5. Select the theme with the features you want to buffer from the combo box.
6. Type in an interval width.
7. Type in the number of buffer intervals you want to generate.
8. Specify whether you want to confine buffering to your study area. If you have a Study Area Theme specified, but do not want to apply it, the buffering function will ignore the study area boundaries.
9. Specify whether you want the buffered features to be included in the first buffer interval.
10. Click the ‘Buffer’ button.
The output buffer grid theme
If you have specified that the buffered features not be included in the first buffer interval, the cells defining them will have a value of 1.
The cells in each buffer interval will have a value of the upper limit/distance of the buffer interval.
Cells outside your last buffer have a value of the last buffer interval plus 1.
Spatial Analyst: Version 1.0 vs 1.1
A problem occurs periodically with Spatial Analyst 1.0 in which it is unable to create a temporary GRID during the calculation of a GRID of Euclidean distances. If this is happening the same type of error message will occur while running the Find Distance function in the Analysis menu, or when running the Buffer Feature... function from the Weights of Evidence menu.
This problem has been corrected in version 1.1.
| Next | Top of Section | Home |